Author: Elma Dilaver Gheith
Viewers: 1,162
Last month viewers: 2
Categories: PHP Tutorials, Sponsored
The custom post types feature is very powerful because it can turn what would be a blog post page into anything, as long as you know how to take advantage of it or you can use a plugin to simplify your task.
Read this article to learn about the Easy Content Types plugin and you can use it to easily create new custom post types, taxonomies and meta boxes.
Contents
Introduction
What is the Easy Content Types Plugin?
Installation Process
Features
Custom Post Types and Taxonomies
Meta boxes and Field Types
User Access Control
Starting
Post Types
Taxonomies
Meta Boxes
Export Code for Post Types and Taxonomies to Sites that Do Not Use this Plugin
Conclusion
Introduction
As a developer you know that you can write great plugins for WordPress using just some PHP code and maybe some JavaScript and CSS files.
However, if you have plugins that already do what you need, you can save a lot of time. The Easy Content Types plugin is one of those plugins.
It provides an easy way to create custom post types, taxonomies and meta boxes. The is equally interesting for developers and also non-developer users.
Non-developer users will appreciate the simplicity provided by this plugin, while creating and updating their Web sites. Developers on the other hand will appreciate taking less time to create post types, taxonomies and meta boxes, without being forced to write the whole code for new plugins.
What is the Easy Content Types Plugin?
The Easy Content Types plugin is a great tool for people that wants to have a lot of content on their Web sites. It helps by keeping control over the existing amount of text, as well as adding new text.
For instance on blogs, where the content is changing on a daily basis, this plugin is perfect for organizing content, by creating custom post types, taxonomies and meta boxes in a very fast and simple way.
Installation Process
To install this plugin go to the creator site at themeisle.com first and login. Then go to the Easy Content Types plugin page. You can choose from three different of license types: for a single site, for 3 sites and unlimited sites. After choosing the license you want click on “Add to Cart”.
The next step requires your personal information and billing details, so you can purchase the plugin before you can download it. After purchasing go to your Purchase history page” that you can find if you click your username on the right upper corner of the page. On the “Purchase history”, you will find this plugin in a table so you can download it.
After downloading the plugin, you have to go to your WordPress admin page. Under “Appearance”, you will find the "Install Plugins" button. If you click on it, you can add a new plugin by choosing the downloaded file, uploading it and then just clicking on "Install Now".
Word Press will need a few seconds to install the plugin. All you have to do next is to activate the plugin by clicking on “Activate Plugin”.
Features
With post types, users can create advanced organisation schemes for your WordPress Web site. Custom taxonomies help to define the organisation within the custom post types, but also simplify the organisation when it comes to displaying the content on the front-end. This way the Web site becomes easier to navigate.
Meta boxes and custom post meta fields provide a possibility to add information sections or to display additional information. Meta boxes allow adding additional information sections to the post editor, providing numerous types to choose from, like text inputs, drop down menus, radio buttons and much more. This way every website owner can create section with fields in seconds.
For developers, the custom meta fields give even the opportunity to control aspects of the layout in the theme files.
Custom Post Types and Taxonomies
The features for the custom post types and taxonomies are numerous. Here are just few of them. The interface is user-friendly. Post types and taxonomy can be edited after creation, while the user gets control over all post type and taxonomy attributes and support options.
Support for advanced permalink structures is included as well as query post short code, so the administrator can list the custom post type entries anywhere. To make it even easier, there is extensive documentation and explanation of post types and taxonomies.

Meta boxes and Field Types
The interface of meta boxes is also easy to use and the meta boxes can be, as well as custom post types and taxonomies, edited after creation.
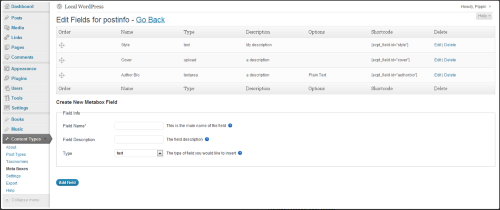
A unlimited list of fields can be added to the meta box, while the post type, that receives the meta box has to be chosen. Even 10 different field types are provided and can be edited after creation.
For every field, there are automatic shortcodes and all meta field are being displayed automatically. The code of every single meta box and field can be exported for use on sites without the Easy Content Types Plugin.
The list of features goes on, the field types vary between text inputs, textarea inputs, checkbox inputs, select inputs, datepicker inputs, radio buttons, repeatable text inputs, repeatable upload fields and more.
User Access Control
The administrator of the Web site has the possibility to control the access for users, such as which user levels have access to the custom content type menu, which users are allowed to create custom post types, custom taxonomies or custom meta boxes. All of the custom post types, taxonomies and meta boxes can be registered.
Starting
To start with this new plugin, just go to “Content Types” button on the left menu of your admin page. There you can choose between “Post Types”, “Taxonomies” and “Meta Boxes”.
You can also take a look at the section “About”, to find more about this plugin, as well as about the features individually. In the section “Settings”, you can define details about the post types, taxonomies and meta boxes in general and gain more control over these content types.
Post Types
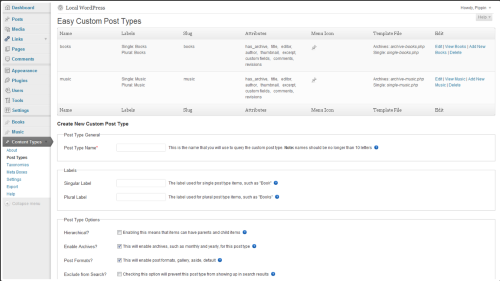
For creating post types, you have to choose “Post Types” under “Content Types” in the left menu. To create a new post type, you need to enter a name. You can choose between a singular and a plural label, but there are also numerous advanced labels, which allow the perfect organisation of your content on the Web site.
You can also choose between different post types options and add a menu icon by uploading images from your computer or by entering the URL to the menu icon.
By choosing different options, you can for example enable archives, post formats, gallery, exclude the post type from showing up in search results and more. Beside the “Post Type Options”, you can also enable different elements for the post type in the section “Post Type Supports”, like: title, editor, author, thumbnail, custom fields, etc. The explanation for every single element is provided, so you can decide more easily, whether to enable elements or not. Advanced users can also enable additional support options, like “headway-seo”.
In the “Advanced” section, you can enter a menu position for the post type, as well as a post type slug. There are help icons beneath every single option, where you can find explanations and helpful information, like for example a list of menu positions, if you choose to enter one for your post type.
After choosing the options you want, you just need to click on “Add Post Type” at the bottom and the post type is ready. After creating the post type, you can find the information about it in a table, where all the post types, you create, will be visible.

Taxonomies
For creating taxonomies, you have to choose “Taxonomies” under “Content Types” in the left menu. To create a new taxonomy, you need to enter a name. You also need to choose an “Object”, which is actually the post type, that will use this particular taxonomy.
Here, you can also choose the name for a single or a plural label. Under the “Taxonomy Options”, you can choose to enable several properties. So, you can choose for instance, whether items can have parent and child items, if this particular taxonomy can be displayed as a tag cloud, if the taxonomy, you are creating, will be shown up in a custom navigation menu interface, if there is going to be a slug or not.
After clicking on “Add Taxonomy”, the new taxonomy is created. Beside every single option, explanations and tips are provided, as well as a help icon for additional help. The created taxonomies are also visible in a table again, where you can find the general information about them.
Meta Boxes
To create a new custom meta box, first you have to choose “Meta Boxes” under “Content Types” in the left menu. Here you can choose between different general properties, but the first thing, you have to do, is to enter a metabox name.
You can choose a post type, that will use this particular metabox, as well as define where the metabox is going to be displayed on the editor screen. For that purpose, you have to choose between “normal”, “advanced” and “side”.
Again, the properties are explained on the right side, but also in detail if you click on the help icon. You can also determine the priority of your metabox, by choosing between “default”, “high”, “core” and “low”. The purpose of priority is also explained on the right side of the property, so you can easily pick what you want to choose. You have also the opportunity, to limit the metabox to specific post or page IDs.
To create the metabox, you just have to click on “Add Meta Box” on the bottom. After that the information about the created metabox will be visible in a table.

Export Code for Post Types and Taxonomies to Sites that Do Not Use this Plugin
Conclusion
If you want to enhance your WordPress site beyond the blog post listings, custom post types are the way to go. This makes an WordPress a universal Web application development platform.
Despite this plugin is paid, the time it saves to developers or non-developer WordPress users to create custom post types is amazing. So the money it costs is well spent.
Apart from the various properties and options, this plugin provides, I appreciate the explanations and tips provided, which make it really easy for everyone to create and manage content on the personal Web site or blog.
Besides the provided tutorials, as well as explanations and help icons during creating post types, taxonomies and meta boxes, users can rely on a great support. You just have to contact the author of the plugin on a discussion board about the issue they have and the response is provided within hours. Such a support even enhances the value of this already great plugin.
If you liked this article or have questions about the Easy Content Types plugin, post a comment here.
You need to be a registered user or login to post a comment
Login Immediately with your account on:
Comments:
1. Does this article seem just like an advertorial? - Joshua Feldman (2016-05-04 22:16)
Wanting to know if this is open source or not... - 1 reply
Read the whole comment and replies


