Author: Elma Dilaver Gheith
Viewers: 884
Last month viewers: 1
Categories: PHP Tutorials, Sponsored
Read this article to learn how to embed nice interactive charts and graphs in your WordPress blog using the Visualizer plugin.
Contents
Introduction
How to Install the Plugin
Plugin Features
How to Access the Plugin Features
Create Your First Chart
Conclusion
Introduction
The Visualizer Charts and Graphics plugin was developed to help WordPress users to create, manage and embed interactive charts into WordPress websites.
Currently it can present 9 types of different chart types that are rendered using HTML5 and JavaScript and SVG, providing cross-browser compatibility as well as a cross platform portability to work with mobile devices like iPhone, iPad and Android devices.
This plugin is freely available from themeisle site. It is easy to use and providing means to configure an extensive set of options to adjust the look of the charts on the blog posts.
This article presents in more details the features provided by this plugin, as well a tutorial on how to install and use this plugin on your WordPress blog.
How to Install the Plugin
Then go to your Purchase history page that you can find here if you go with the mouse over your username on the right upper corner. There you will find the plugin in a table for you to download.
After downloading the plugin, you have to go to your WordPress site admin page. Under Appearance, you will find Install Plugins link. If you click on it, you will have the possibility to add a new plugin by choosing the downloaded file, uploading it and then just clicking on Install Now.
Word Press will need a few seconds to install the plugin. All you have to do next is to activate the plugin by clicking on Activate Plugin link.
Plugin Features
The features of this plugin allow users and developers to use it easily and to customize the charts to the specific needs of your WordPress Web site, including using multiple charts on the same page.
It is fully customizable, so it allows to configure every chart individually. The integration of multiple charts on the same page is possible because you can use short codes.
How to Access the Plugin Features
To access this plugin features you have to go to your WordPress site Plugins page and find this plugin. To do that you can type the name of the plugin to the search box on the right and than click on Search Installed Plugins. The plugin will appear, so you can go to Library to configure it. You can deactivate the plugin by clicking on Deactivate link or to edit the code using the Edit link.

Create Your First Chart
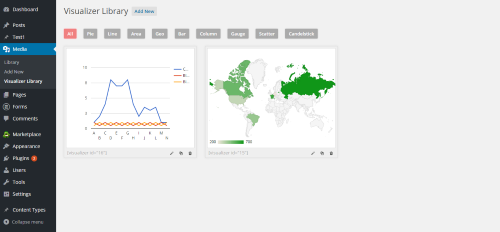
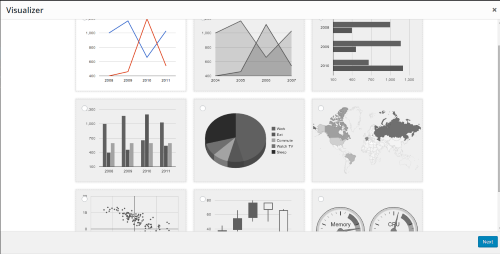
If you want to start working with charts using this plugin, click on the Library link. If you click on Add New link, you will get to the Visualizer page where you can choose between different types of charts.
To see the list of supported features of a chart, you should choose that particular type of charts and click Next on the right lower corner. You will also get the possibility to upload a CSV file from your computer or from Web with data for your chart.
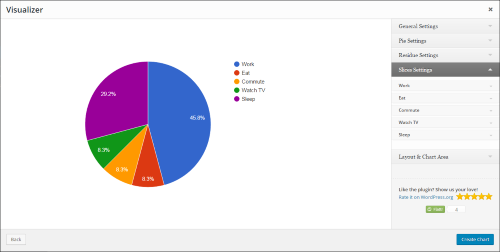
If you however choose to click on Next right away, you will find different settings on the right menu, like: General Settings, Horizontal Axis Settings, Vertical Axis Settings, Color Axis, Size Settings, Layout Settings, Bars Settings, Series Settings, Lines Settings, Pie Settings, Slices Settings, Residue Settings etc. The available settings depend on the chart type you choose.

Each of the settings offer a variety of properties with which you can configure elements like title, font style, grid lines, width and height of chart, etc.. The properties depend on the settings you choose.
After configuring all the settings, just click on Create Chart and the chart is ready. It will appear on the Visualizer Library, where you can edit, clone or delete it just by clicking on the particular icon on the lower right corner of the chart.

On the left lower corner of the chart, you can see a short code (a visualizer id). You just need to copy this code and paste it to the text area of the blog article where you want the chart to appear on the Web site.
The developers of this plugin made sure to provide a clean and validated code which allows users to edit the code with enough HTML and PHP knowledge. This plugin is also developer friendly, so it is possible to extend the core features by using a variety of hooks and filters.
Conclusion
The Visualizer Charts and Graphics WordPress Plugin is a great tool, to create different types of charts and to adjust them to the layout and needs of your WordPress Web site.
The best thing about this plugin is its simplicity when it comes to installation and use. I also like the possibility of integrating multiple different charts on the same page, thanks to support of short codes.
The base version of this plugin is available on themeisle site for free and offers a huge number of different settings and online support. There are also business and developer versions if you need to use this in many sites or need priority support.
If you liked this article or have questions about the Visualizer Charts and Graphics WordPress Plugin, post a comment here.
You need to be a registered user or login to post a comment
Login Immediately with your account on:
Comments:
No comments were submitted yet.


